|
|
| Camp Kit List | Patrol Site Layout | Tents | Tools | Fires & Cooking | Pioneering |
Lighting fires is a very important skill to learn. We use fires primarily to cook on, so if you want your tea on time you will need to know how to start a fire and look after it until you are finished. |
Step 1 - Build Your Fire
Most campsites have a supply of
half oil drum fires for campers to use. This save alot of time and effort as you will not have to build one yourself. However, if you are camping on a greenfield site, then your will have to build an alter fire before you can cook. You should first remove the turf from the area you want to put your fire and place it grass side down. You will need to put this back at the end of the camp so it should be watered to prevent it from dying. The fire should then be built from large rocks and sand. Starting with the large stones you should build the base first. Once this has been done,a wall on three sides should be built, with the open side facing the wind. Remember that the wood you will burn needs to be able to fit in the pit of the fire so the bigger it is the better. Building a good alter fire will set you up for the rest of the camp. A poorly constructed fire will need to be fixed constantly and may fall to bits whilst you are cooking on it.
|
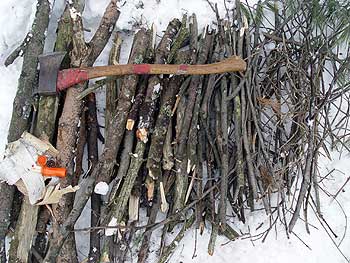
Step 2 - Collect Wood
You must collect all the wood you will need BEFORE you light the fire. Fires burn a lot of wood so a couple of handfulls of twigs will not be sufficient to sustain the fire for very long. Live trees and bushes should never be damaged when collecting wood, only dead wood should be used. The wood should also be dry. Wet wood will give off a lot of smoke when it is burnt. Larger sticks and logs should be cut into smaller pieces so that they will burn more easily. The wood should be sorted into different sizes and kept under a plastic sheet in your wood pile |
|
Step 3 - Build a small wigwam
Using kindling a small wigwam shaped pile of sticks should be build. A small gap should be left open in the windward side so a match can be easily placed right in to the kindling. |
Step 4 - Light the fire
Light the kindling with a match. If it is dry it should take hold quickly. If it does not, blow very gently on the fire. |
Step 5 - Adding more wood
Continue to add small bits of wood to the flames. As the fire grows, add larger twigs then sticks.
|
Step 6 - Nearly there
When the fire is firmly established, you can abandon the wigwam shape by adding more sticks and split logs. Place a fire grill across your fire and you will be ready to start cooking. |
Step 7 - Cooking
It is importat that you keep feeding your fire with wood, whislt you are cooking. Cooking over a cool fire is slow and frustrating so it is worthwhile keeping the fire fed with lots of wood. 'An army' it is said, 'marches on its stomach,' the same is true for a Troop of Scouts or a Pack of Cubs. |
Remember
Fires are dangerous. You should never run around near the fire or play games near it. Once placed in the fire, sticks should not be removed. A bucket of water should always be kept next to a lit fire incase it needs to be used in an emergency. If you act responsible, fires are safe and practical tools. However, If you are careless the there is a good chance that you could cause an injury to yourself or another Scout. |
| |
|
|
©107th Pentland Scouts (Craiglockhart Parish Church) Edinburgh |
27.03.14
| Terms of Use | Privacy Policy | Contact Us |